
拉斐尔Anachoreta
Rafael is a senior QA engineer with nearly 10 years of experience working with testing, 自动化, 通过监督,让团队和产品变得更好.
Rafael is a senior QA engineer with nearly 10 years of experience working with testing, 自动化, 通过监督,让团队和产品变得更好.
每次都有一个新版本的组件库, Picasso, 被释放, we update all of our front-end applications to get the most out of the new features and align our designs across all parts of our site.
上个月, 我们推出了一个毕加索更新到Toptal人才门户, 我们的人才用来找工作和与客户互动的平台. 知道新版本的发布会带来重大的设计变化, 为了尽量减少意想不到的问题, it made sense to use visual regression testing techniques to help us find problems before the release.
视觉回归测试并不是一个新概念; plenty of other projects at Toptal already use it, 包括毕加索本人.
像Percy这样的工具, Happo, 和Chromatic可以用来帮助团队构建健康的视觉回归管道, 我们一开始确实考虑过添加它们. We ultimately decided the setup process would be too time-consuming and could derail our schedule. 我们已经为开始迁移的代码冻结设定了日期, 离最后期限只有几天了, 我们别无选择,只能发挥创造力.
虽然我们在项目中没有视觉回归测试, 我们使用Cypress进行了很好的UI集成测试. 尽管这并不是这个工具的主要用途, 赛普拉斯在其文档中有一页专门用于 视觉检测 另一个列出了所有的 可用插件 来帮助配置Cypress进行视觉测试.
After going through the available documentation, we decided to give cypress-snapshot-plugin a try. 只花了几分钟就设置好了, 一旦我们做到了, 我们很快意识到我们追求的不是传统的视觉回归输出.
Most visual regression tools help identify unwanted changes by comparing snapshots and detecting pixel differences between a known, 可接受的基线和页面或组件的修改版本. 如果像素差大于设置的公差阈值, 将页面或组件标记为手动检查. 在本新闻稿中, though, 我们知道我们将对大多数UI组件进行一些小的更改, 所以设置一个阈值是不适用的. 即使给定的组件碰巧是100%不同的, 它在新版本的上下文中可能仍然是正确的. 类似的, a deviation as small as a few pixels could mean a component is not currently fit for production.

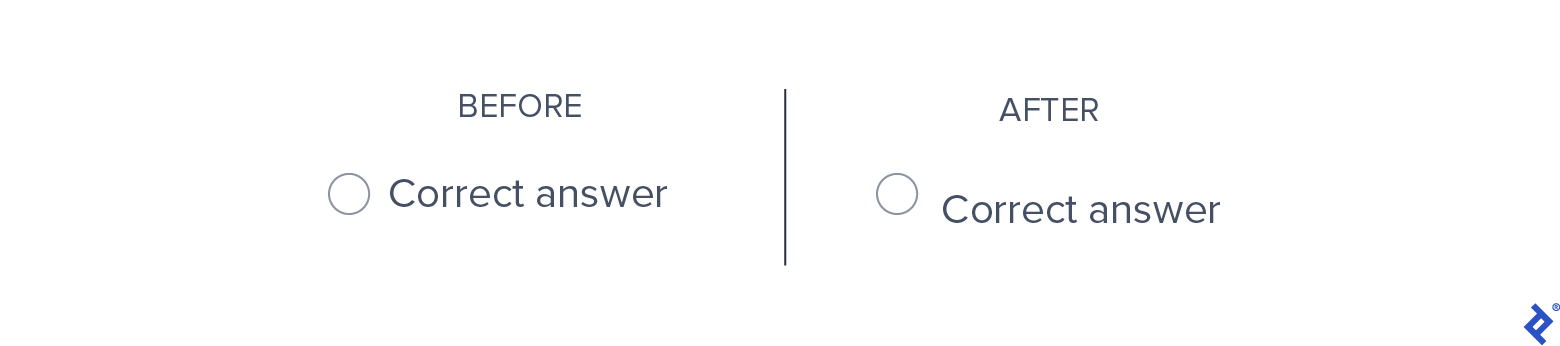
在这一点上, two contrasting things became clear: noting pixel differences was not going to help identify issues, 而对这些组件进行并排比较正是我们所需要的. We put the snapshot plug-in aside and set out to create a collection of images with our components before and after the Picasso update was applied. 这种方式, we could quickly scan through all the changes to determine if the new versions still matched the site’s needs and the library’s standards.
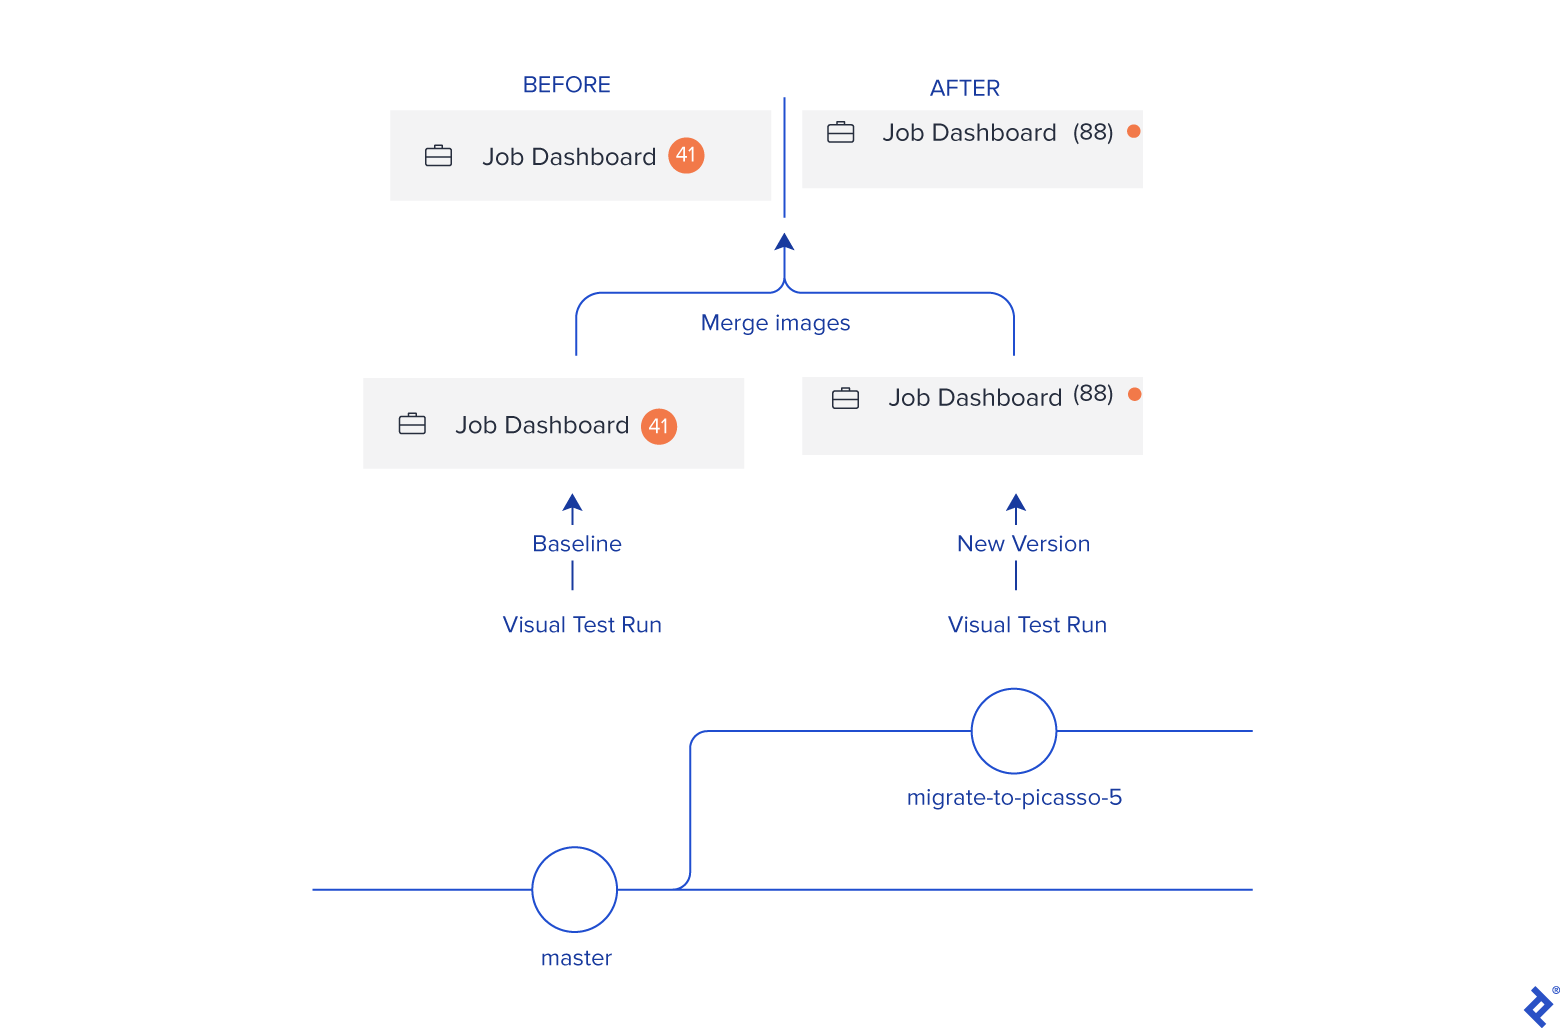
新的计划是截取一个组件的屏幕截图, 本地存储, take a new screenshot of the same component in the branch with the updated Picasso version, 然后将它们合并成一张图像. 最终, 这种新方法与我们开始的方法没有太大不同, but it gave us more flexibility during the implementation phase since we no longer needed to import the plug-in and use its new commands.
心中有一个明确的目标, 是时候看看Cypress如何帮助我们获得所需的截图了. 正如前面提到的, 我们有大量的UI测试覆盖了大部分的人才门户, 所以为了收集尽可能多的关键部件, 我们决定在每次交互后截取单个元素的屏幕截图.
An alternative approach would have been to take screenshots of the entire page at key moments during the test, 但我们认为这些图像很难进行比较. Also, such comparisons could be more prone to human error, such as missing that a footer had changed.
A third option would have been to go through every single test case to decide what to capture, 但那样会花费更多的时间, 因此,坚持页面上使用的所有元素似乎是一种实际的妥协.
我们转向Cypress的API来生成图像. The cy.截图() command 可以开箱即用地创建组件的单独映像,以及 截图后的API 允许我们重命名文件, 更改目录, 并区分视觉回归运行和标准运行. 将两者结合起来, we created runs that did not affect our functional tests and enabled us to store images in their appropriate folders.
首先,我们扩展了 index.js file in our plug-ins directory to support the two new run types (基线 and comparison). 然后,我们根据运行类型为图像设置路径:
/ /插件/索引.js
Const fs = require('fs')
Const path = require('path')
module.exports = (on, config) => {
// Adding these values to your config object allows you to access them in your tests.
  config.env.基线=过程.env.基线|| false
  config.env.比较=过程.env.比较|| false

  on('after:screenshot', details => {
    //我们只想修改基线和比较运行的行为.
    如果配置.env.基线||配置.env.比较){
      // We keep track of the file name and number to make sure they are saved in the proper order and in their relevant folders.
      //另一种方法是在文件夹中查找最新的映像, 但这是更简单的方法.
      let lastScreenshotFile = "
      让lastScreenshotNumber = 0

      // We append the proper suffix number to the image, create the folder, and move the file.
      const createDirAndRename = filePath => {
        if (lastScreenshotFile === filePath) {
          lastScreenshotNumber + +
        } else {
          lastScreenshotNumber = 0
        }
        lastScreenshotFile = filePath
        const newPath = filePath.替换(
          '.png',
          " # $ {lastScreenshotNumber}.png`
        )

        return new Promise((resolve, reject) => {
          fs.mkdir(路径.dirname(newPath), { recursive: true }, mkdirErr => {
            if (mkdirErr) {
              返回拒绝(mkdirErr)
            }
            fs.重命名(细节.path, newPath, renameErr => {
              if (renameErr) {
                返回拒绝(renameErr)
              }
              解析({path: newPath})
            })
          })
        })
      }

      const screenshotPath = ' visualComparison/${配置.env.基线 ? '基线': 'comparison'} '

      返回createDirAndRename(细节.path
        .替换(柏树/集成,screenshotPath)
        .替换('All Specs', screenshotPath)
      )
    }
  })
  返回配置
}
Then we invoked each of the runs by adding the corresponding environment variable to the Cypress call in the project’s package.json:
"脚本":{
  "cypress:基线": " 基线 =真纱cypress:open",
  "柏树:比较":"比较=真纱柏树:开放"
}
一旦我们运行了新的命令, we could see that all the screenshots taken during the run were moved to the appropriate folders.

接下来,我们尝试覆盖 cy.get()柏树的 main命令返回DOM元素, and take a screenshot of any elements called along with its default implementation. 不幸的是, cy.get() 更改命令是否很棘手,因为在其自己的定义中调用原始命令 导致无限循环. The suggested approach to work around this limitation is to create a separate custom command and then have that new command take a screenshot after finding the element:
Cypress.Commands.add("getAndScreenshot", (selector, options) => {
  //注意:当获取多个元素时,可能需要调整命令.
  返回cy.(选择).截图()
});

it("get overwrite", () => {
  cy.访问(“http://example。.cypress.io /命令/行动”);
  cy.getAndScreenshot(“.action-email”)
})
However, our calls to interact with elements on the page were already wrapped in an internal getElement () function. So all we had to do was make sure that a screenshot was taken when the wrapper was called.
一旦我们有了截图,剩下唯一要做的就是合并它们. 为此,我们创建了一个简单的节点脚本 Canvas. 最后,该脚本使我们能够生成618个比较图像! 一些差异很容易通过打开天赋门户发现, 但有些问题并不那么明显.

首先, the added visual regression tests proved to be useful and uncovered a few issues we could have missed without them. 尽管我们期望我们的组件有所不同, 了解实际改变了什么有助于缩小问题案例的范围. So, if your project has an interface but you aren’t yet performing these tests, get to it!
The second lesson here, and perhaps the more important one, is that we were once again reminded that 完美是善的敌人. If we had ruled out the possibility of running visual regression tests for this release because there was no prior setup, 我们可能在迁移过程中遗漏了一些bug. Instead, 我们同意了一个计划, 虽然不理想, 执行速度快, 我们朝着这个方向努力, 它得到了回报.
For more details on implementing a robust visual regression pipeline in your project, 请参考 赛普拉斯的视觉测试页面,选择最适合您需求的工具,并观看教程视频.
Visual regression testing is a type of regression testing that ensures web pages or components that were known to be correct have not changed unexpectedly.
Visual regression testing works by comparing the visual aspects of an application against a known 基线. Usually, 这是通过区分图像中的像素来实现的, though some solutions use artificial intelligence to distinguish real differences from false positives.
Regression testing is the testing of a previously tested application following changes to ensure defects have not been introduced as a result of said changes.
We run regression tests to prevent the introduction of unexpected or unwanted behavior in an application when changes are made.
世界级的文章,每周发一次.
世界级的文章,每周发一次.